Changing the orange LED to white LED on the cluster to look like M5 or
 09-25-2014, 08:58 AM
#371
New Members

Join Date: Mar 2013
Location: Poland / Wroclaw
Posts: 5
Likes: 0
Received 0 Likes
on
0 Posts
My Ride: E60 535D
I find the company that made the cluster shields and this triangle with logo alpina and the controls.
Everything it's my project becouse ALPINA didn't have diesel in e60 body
The rest of cluster i painted on /the same colour like shields and triangle.
the all cost its max 120 EURO and 5 hours work.
But the result it's amazing /now i love drive my car in the night/
This is one step to ALPINA look in my E60
Now looks like that
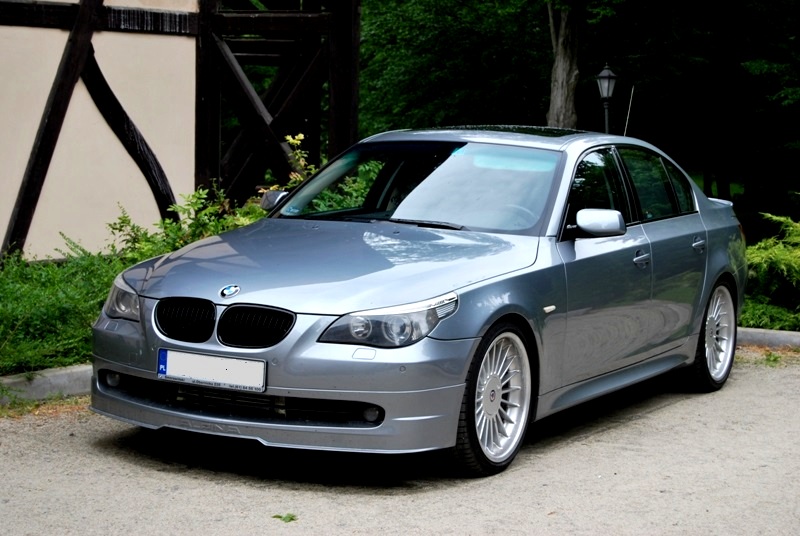
And with LCI light and deco-set ALPINA
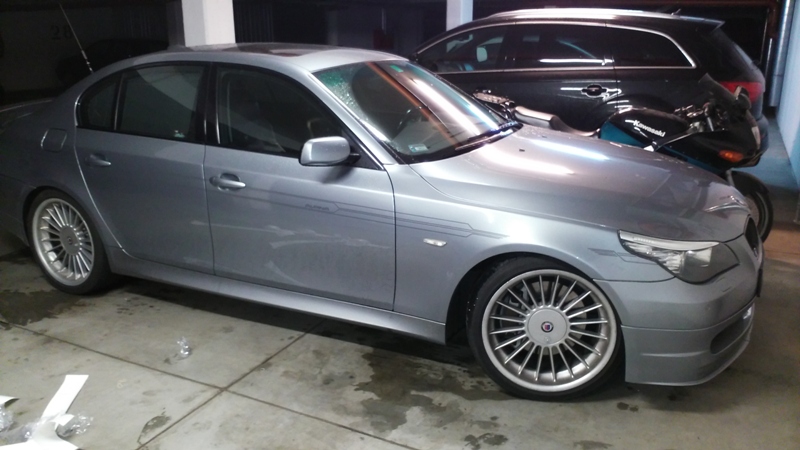
on the beginning looks ...
http://img843.imageshack.us/img843/9782/bjp7.jpg
Oli
Everything it's my project becouse ALPINA didn't have diesel in e60 body
The rest of cluster i painted on /the same colour like shields and triangle.
the all cost its max 120 EURO and 5 hours work.
But the result it's amazing /now i love drive my car in the night/
This is one step to ALPINA look in my E60
Now looks like that
And with LCI light and deco-set ALPINA
on the beginning looks ...
http://img843.imageshack.us/img843/9782/bjp7.jpg
Oli
Last edited by niunia i oli; 09-25-2014 at 09:04 AM.

 10-03-2014, 01:20 AM
#374
New Members
Join Date: Mar 2013
Location: Poland / Wroclaw
Posts: 5
Likes: 0
Received 0 Likes
on
0 Posts
My Ride: E60 535D
Thx.
What do You mean?? The picture it's some posts before
The website no but I have all history on forum
BMW Sport :: Zobacz temat - Niunia i Oli -->> E60 535D ALPINA D5S - HAMOWNIA str 10
Sorry but only in polish
What do You mean?? The picture it's some posts before
The website no but I have all history on forum
BMW Sport :: Zobacz temat - Niunia i Oli -->> E60 535D ALPINA D5S - HAMOWNIA str 10
Sorry but only in polish
11-09-2015, 06:58 AM
#375
New Members

Join Date: Nov 2015
Location: london
Posts: 2
Likes: 0
Received 0 Likes
on
0 Posts
My Ride: bmw 1 series
1st thing to do is unplug the battery.
01. Before the change.
Attachment 72727
02. There are 2 screws at the top which need to be undone to take out the cluster.
Attachment 72728
03. At the back there is a plug which need to take off.
Attachment 72729
04. Undo these 4 screws with a T10 screw driver
Attachment 72730
05. Undo the 4 clips by pushing it down and out.
Attachment 72731
06. Undo the 2 clips, then take off the casing.
Attachment 72732
07. Use a card and a fork to take off the needles, don't use too much force cos they will brake very easy.
Attachment 72733
Attachment 72734
08. At the back turn the plastic ring in the center clockwise to undo the ring and panel.
Attachment 72735
Attachment 72736
09. Undo the 2 screws with a T9 screw driver.
Attachment 72737
10. Take off the gear for the Cruise Control ring and rev ring.
Attachment 72738
11. You will see the 4 LEDs in each of the ring.
Attachment 72739
12. At the back. The board is fixed to a socket so just undo the board by pulling it up slowly.
Attachment 72740
13. Take out the LED board.
Attachment 72741
Attachment 72742
14. You will see 4 LEDs on each ring.
Attachment 72743
15. Use a solder iron to take off the old LEDs .
Attachment 72744
Attachment 72745
16. For the new 1s you will need 8 white LEDs. Solder the new white LEDs back on. Each ring will need 4 LEDs. On each led legs there will be a + and - for the power so get a multi meter to test which is which. If solder wrongly it will not light up.
Attachment 72746
17. On the white case use some double sided tape to sick down the board coz if not the board will not stay in place.
Attachment 72747
18. Spray the ring which ever colour you like.
Attachment 72748
Attachment 72749
19. For the needle paint them red.
Attachment 72750
Attachment 72751
Attachment 72752
Attachment 72753
20. There you go finished here is the end product.
Attachment 72754
Attachment 72755
I would like to say many thanks to ricky1329 helping to make this dream come true.
If it was not for him this mod would never have happened and I would not have done a DIY.
If you what any more info on any thing about this mod, please ask us in the Topic and we would be happy to post it up for every 1 to read.
If you would like to buy a set of white LEDs please pm me for a price.
hi, how are you?
got a question, i have a bwm 1 series and want to get the interior led conversions done for example speedo lights changing to either blue or white colour. I am based in east london,
Is it possible to get them changed if so let me know please
regards
11-09-2015, 05:40 PM
#376
Contributors
Thread Starter
Join Date: Sep 2006
Location: Hong Kong
Posts: 21,274
Likes: 0
Received 0 Likes
on
0 Posts
My Ride: Mini Cooper
sorry we have stop doing this mod
11-15-2015, 11:38 PM
#378
New Members
Join Date: Mar 2013
Location: Poland / Wroclaw
Posts: 5
Likes: 0
Received 0 Likes
on
0 Posts
My Ride: E60 535D
Hi,
last week i change leds in my friend cluster in e90.
I think in 1er You can do the same

I dont have 1er cluster but its look almost the same like e60.
If You want i can do this for You but in Poland
Oli
09-07-2017, 05:02 AM
#379
New Members

Join Date: Sep 2017
Location: Shropshire
Posts: 2
Likes: 0
Received 0 Likes
on
0 Posts
My Ride: E60 535d
Sorry to bring an old thread back to life!
I've recently changed the LED's in my clocks from amber to Xenon white. Since removing the needle motor assembly from the board and removing the fuel gauge LED (and soldering back on as I realised I didn't have the correct size to replace!), my fuel gauge doesn't work and both the fuel gauge and MPG gauge needles aren't lighting up?
Anyone have any idea's why both of them would stop working when I removed and re-soldered just the 1 side?
Thanks in advance for any help with this!
06-25-2020, 03:11 AM
#380
New Members

Join Date: Jun 2020
Location: london
Posts: 5
Likes: 0
Received 0 Likes
on
0 Posts
My Ride: e60 530d m sport
I�m reading this many years after it was posted but hopefully someone is still working on these!
would there be any problems in buying a second hand speedo and then doing this? Would the new speedo just have to be coded to the new car?
many thanks
would there be any problems in buying a second hand speedo and then doing this? Would the new speedo just have to be coded to the new car?
many thanks